
FAR & Explorance/Blue SFTP Integration
Integrate Blue Reports into Interfolio
Interfolio Faculty Activity Reporting (formerly Faculty180, now FAR) empowers scholars to tell their own story by including accreditation, CVs, metadata, and reporting. Of course, a key part of many scholars’ stories involve Blue reports. The following procedure explains how to integrate those Blue reports into the FAR product.
This integration will work by first collecting copies of Blue PDF reports for a project and renaming each one according to a naming convention that is compatible with Interfolio, then all of the reports are sent via SFTP to a specific location that Interfolio can access. The Blue PDF reports can then be processed by the Interfolio Technical Services team and uploaded into Interfolio FAR. Unless a pre-arranged cadence is established, a request to load the files must be submitted to help@interfolio.com for each load. The Technical Services Service Level Agreements (SLAs) can be found here.
Prerequisites
- Blue 8.0.3 or newer
- BPI 4.8.0 or newer
- For on-premise customers
- BPI and Blue must reside on the same network.
- Blue report folder is accessible via network share protocol.
- Access to TCP Port 22 (SSH) for transfer.ops.interfolio.com (IPs 3.215.32.29, 52.202.198.155). If Blue is hosted by Explorance contact the Explorance Support to request that this port be opened. Canadian clients must use transfer.ca1.interfolio.com (IPs 35.182.36.146, 99.79.80.71)
- Identify a list of Blue reports from which PDF files will be extracted and uploaded into Interfolio. Naming conventions must follow the guidelines outlined here for course attachments.
- Each client must have an SFTP folder & use a public/private key pair for authentication. Client must explicitly request an Explorance sub-directory in order for the integration to work. SFTP can be set up using the following form: https://product-help.interfolio.com/en_US/technical-resources/sftp-set-up
- Please note: the SSH key pair must be in OpenSSH format. See here for additional instructions on how to generate a key pair.
- (optional) Compile a list of report viewers that can view the reports if you only require a subset of users.
Create an Interfolio PDF Report Pathway
Before we can set up the Interfolio PDF Report Pathway, BPI must be connected to the Blue database. Enter the following information to provide BPI with direct access to the Blue database:
- Server (IP or Server name) - The name of the server hosting the Blue database.
- Instance name - The name of the SQL instance hosting Blue. If Blue is the primary instance of SQL on the server then leave this field blank.
- Username and Password - The username and password credentials that have read and write access to the Blue database.
- DB name - Name of the Blue database.
- Rater field - Leave blank.
Select Test this connection to verify that the link works correctly.
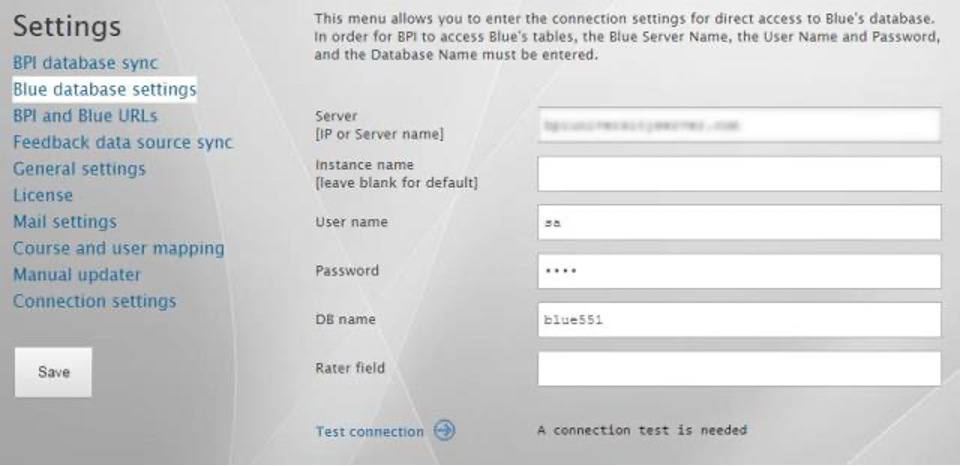
Figure 1: BPI - Settings - Blue database settings
Follow the procedures below to set up an Interfolio PDF Report Pathway in BPI
- Log in to BPI as an administrator.
- Navigate to PATHWAYS.
- Select + Add pathway to begin creating the new pathway.
- Select the Interfolio platform.
- Choose the PDF Report module.
- Click Next to create the pathway
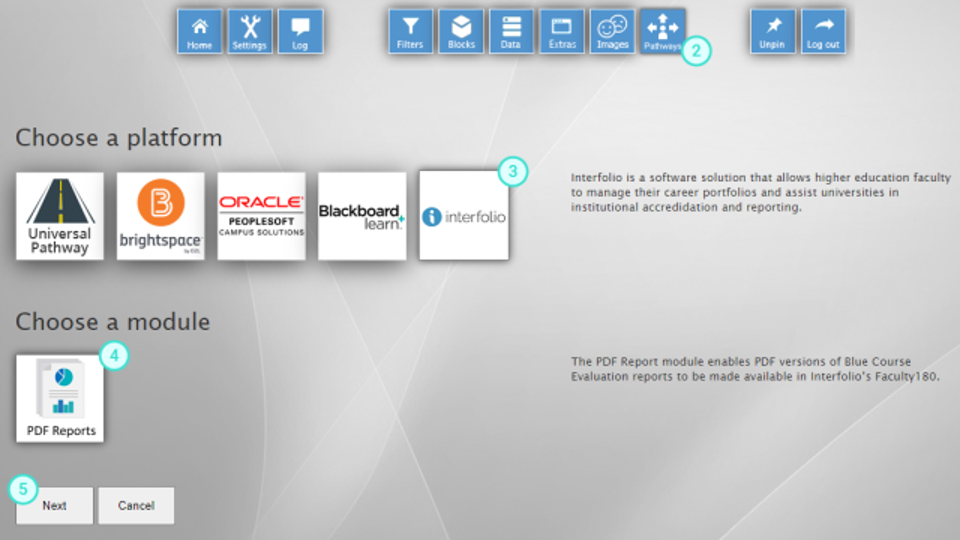
Figure 2: Interfolio PDF report pathway
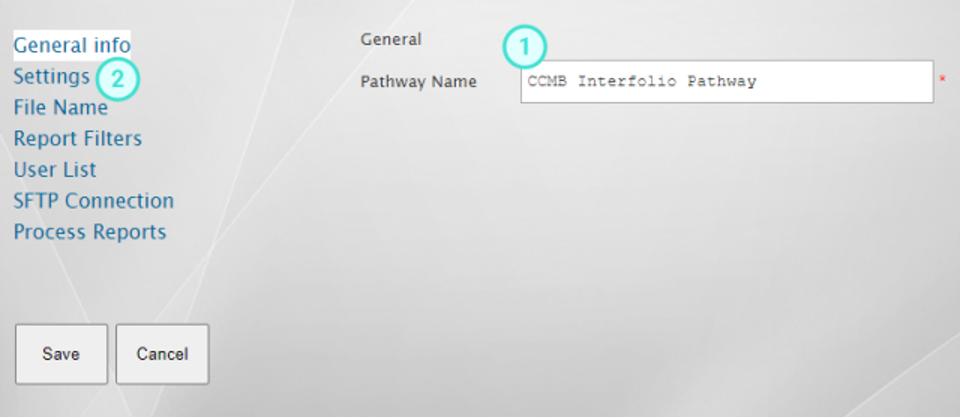
General Info
- Enter a name for the pathway.
- Click Setting.
Figure 3: Interfolio pathway - General info
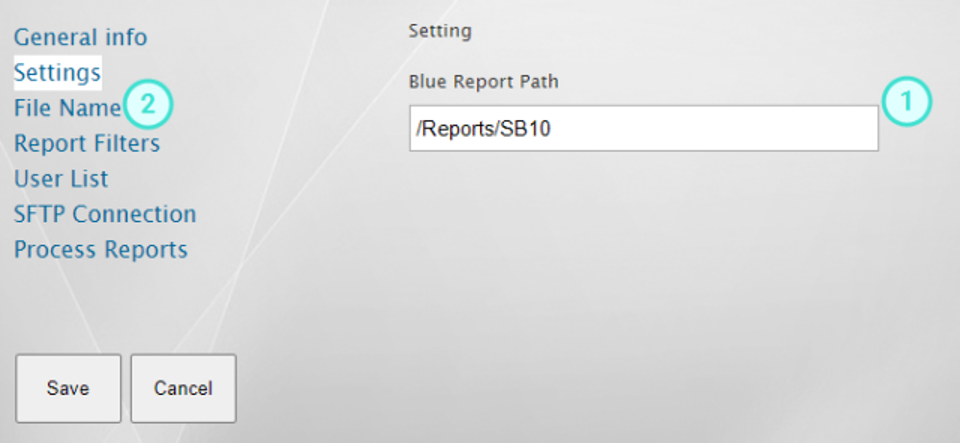
Settings
- Enter the path where Blue reports are being stored on the Blue server.
Note
This path can be either an absolute path or it can be the same relative report path (as shown) that is found in Blue under CONNECTION - COMPONENTS - CONNECTIONS. The relative report path must always begin with a forward slash (/).
- Click File Name.
Figure 4: Interfolio pathway - Settings
File name
Note
Each institution is unique and will have different elements available to develop a naming convention that works for Interfolio. Construct the naming convention according to the agreement between your institution and Interfolio using as many elements as are required to satisfy the agreement.
This section allows you to construct a unique file name for each report based upon the specific details of each individual report. Interfolio FAR requires a specific naming convention that you can define here as shown in the example below. You can define how each element in the file name is separated, which characters in an element should be changed to different characters, and which elements should be included in the report file name. It is the client’s responsibility to ensure that the file name is updated accordingly or the attachment will not load to the correct activity in FAR.
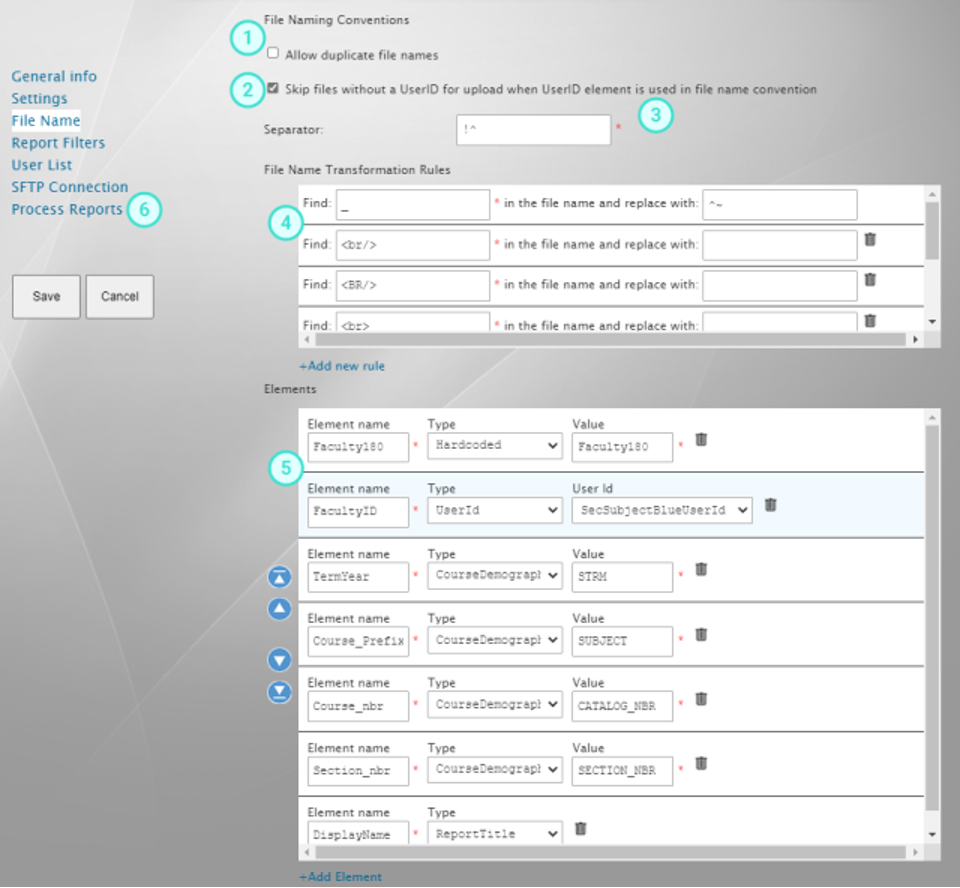
Figure 5: Interfolio pathway - File name
- Set the option to Allow duplicate file names as required. When this option is enabled, reports that have the same file name after being constructed according to the file name elements will have an additional element appended to the end of the file name that will appear as $DupX where X is a sequential number that is incremented for each report with the same file name.
Note
The maximum length of a file name is limited to 255 characters, this is a hard limit imposed by Windows, , as a result, reports with longer file names will be truncated. This may result in duplicate file names, these reports will have an additional element appended to the end of their file name as mentioned.
- Set the option to Skip files without a UserID for upload when UserID element is used in file name convention as required.
Note
This option is enabled by default and is recommended. This option will exclude those reports that do not have a UserID assigned to them. This may be the case for projects with a secondary subject optional definition or a subject only definition because those reports cannot be assigned to any one person.
- Enter the character or characters that are used to separate the elements that compose the report file name.
Note
For Interfolio integration, underscore (_) should not be used as a separator.
- Use this File Name Transformation Rules section to replace characters in the file name with characters of your choice. For instance, you have the ability to replace any underscores (_) in the file name with dashes (-) instead.
- Use the Elements section to add any available elements to compose a unique file name. There are different types of elements that can be added to the file name, they include:
- scsc
- Hardcoded - This is user defined static text that will be added to every file name.
Note
For Interfolio integration, underscore (_) should not be used as a separator.
- ReportLanguage - The five digit code that identifies the language of the report.
- CourseDemographics - A field in the course datasource whose value will be added to the file name. You must specify which field in the datasource you would like to include.
- ReportTitle - The title of the report as it appears in Blue.
- UserID - The unique identifier of the person that should have access to this report. If the User ID in Interfolio does not match the User ID in Blue then one of the mapped User ID options should be used. A mapped User ID accounts for this by using the Interfolio UserID that has been associated with a particular Blue UserID. There are several different UserIDs that can be selected depending on the system. They include:
- ReportViewerBlueUserID - Includes the UserID of the user who can view the report.
- ReportViewerMappedUserID - Requires the field in Blue that is mapped to the Interfolio UserID that can view the report.
- SecSubjectBlueUserID - Includes the UserID of the secondary subject of this report.
- SecSubjectMappedUserID - Requires the field in Blue that is mapped to the Interfolio UserID for the secondary subject
- .ReportCategory - Includes the Blue category of the report as an element in the report file name.
- ReportSubcategory - Includes the Blue Subcategory of the report as an element in the report file name.
- Click Report Filters in the side menu to continue.
- Hardcoded - This is user defined static text that will be added to every file name.
Example
An ideal report name that is sent to Interfolio may look like:
Faculty180!^m0551633!^Fall!^2018!^CIS!^101!^001!^Fall_2018_Course_Evaluation_(CIS_101_001).pdf
Which can be broken apart into the following elements:
<file_prefix>!^<faculty_id>!^<term>!^<year>!^<course_prefix>!^<course_number>!^<section_number>!^<displayed_file_name>.pdf
Element name |
Element type |
Sample value |
file_prefix |
Hardcoded |
Faculty180 |
faculty_id |
SecSubjectMappedBlueUserID |
m0551633 |
term |
ReportSubcategory |
Fall |
year |
ReportCategory |
2018 |
course_prefix |
CourseDemographic |
CIS |
course_number |
CourseDemographic |
101 |
section_number |
CourseDemographic |
001 |
displayed_file_name |
ReportTitle |
Fall_2018_Course_Evaluation_(CIS_101_001) |
Note
|
It may be the case that a single field in the source data is composed of multiple elements, for example, the course code field may be composed of the course prefix, course number and course section.
|
Include this information in a single element and add special notes in the support ticket sent to Interfolio explaining the compound elements.
Report Filters
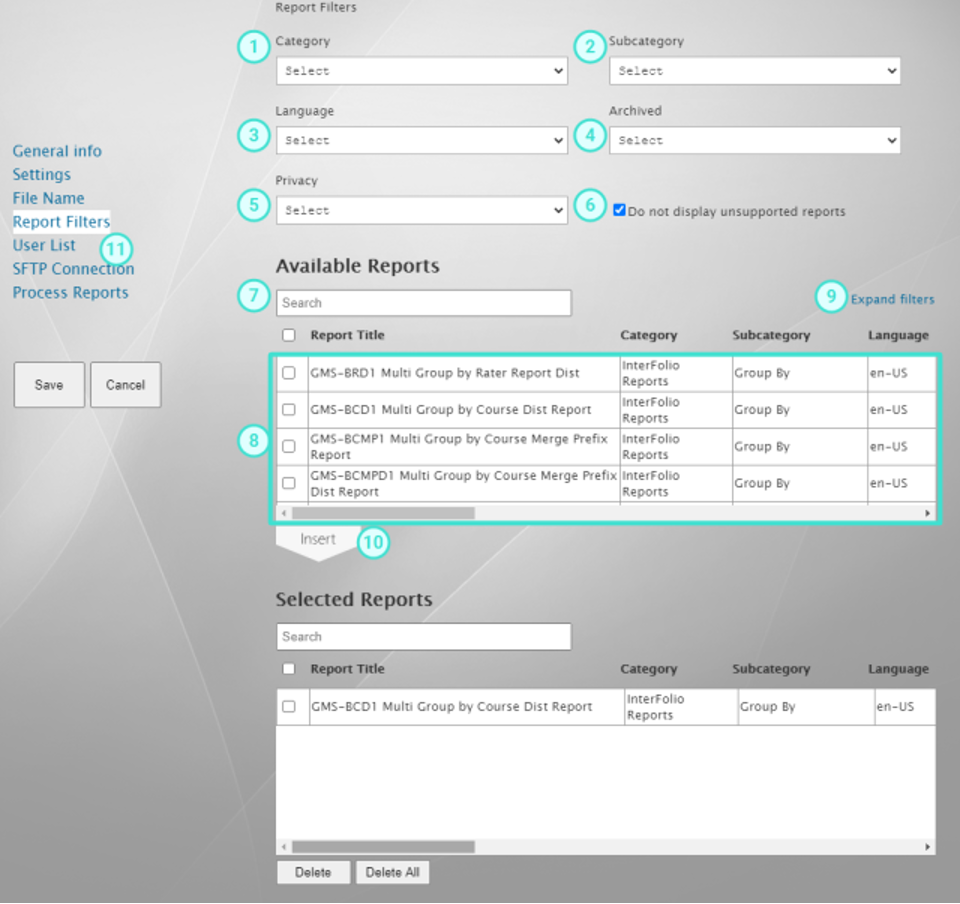
Report filters determine which Blue reports will be included in the extracted package. The report filter options like category and subcategory are based on the contents of your Blue system. When you add a report filter, only the reports that have been selected and inserted into the Selected Reports table will be available to add to the SFTP server.
- Choose a report Category from the drop-down list to select the category assigned to the reports in Blue.
- Choose a report Subcategory form the drop-down list to select the subcategory assigned to the reports in Blue.
- Select which language of the reports you would like to restrict access to..
- Choose whether the report is an archived report or is still active in Blue
- Select whether you want to include public or private reports from Blue.
Note
Public reports can only be included if a User List has been uploaded.
- Choose to hide reports that are not currently supported.
Note
Export reports are not supported.
- Enter specific text in the search box to refine the list of reports that are displayed.
- Select which reports you would like to include in the list of reports that will be extracted to Interfolio. This list of reports is dependent on the filter settings that were set in the previous steps.
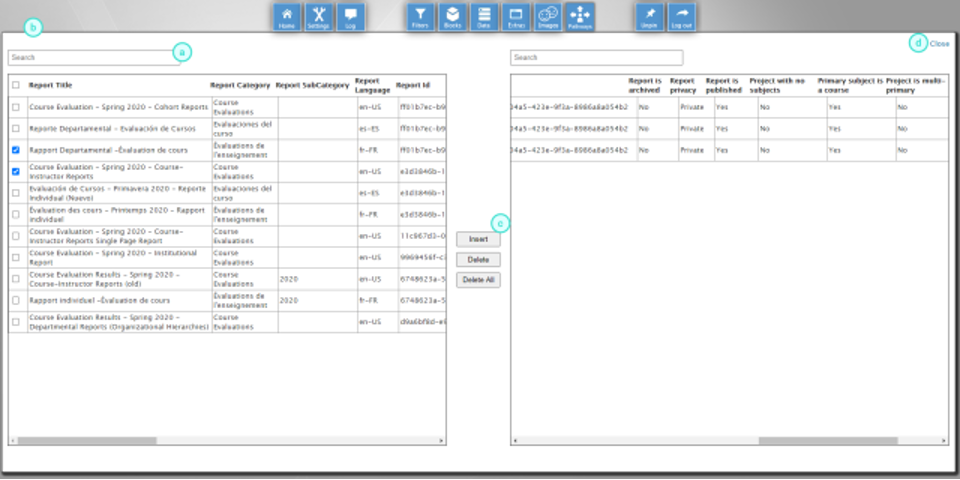
- Click Expand filters to see an expanded view of the available reports and the selected reports to verify your selections.
- Search for reports to include.
- Select a number of reports that will be extracted.
- Insert the selected reports, or remove selected reports.
- Close the window to return to the pathway.
Figure 6: Interfolio pathway - Expanded report filters
- Click Insert to add the selected reports to the Included reports section. Reports can be removed by selecting them and then clicking Delete.
- Click on User List to continue.
Figure 7: Interfolio pathway - Report filters
User List
The User List allows a further restriction of which reports should be extracted.
To limit the selection, upload a CSV file that contains the Blue User ID, first name (optional), and last name (optional) of the user being included in the file naming convention created for this pathway (this will be either the secondary subject ID or the report viewer ID). For example, you may want to only extract the reports for a specific set of faculty members. Then you would only upload those users. If you do not upload a list of users here, then all active reports will be extracted.
The file that is uploaded must be a CSV file that contains three fields: User ID, First name, Last name. The first record must contain the field headers and the name of the fields is irrelevant, but the order must be User ID, First name, Last name.
Sample user list CSV file
User,firstname,lastname
CB20190123,Chris,Billings
DT20041231,Doug,
PG20000423,,
JP19990718,,Peterson
HM20030909,,
HL20170208,Harry,Lindseed
- Click No file chosen to select the CSV file that contains the list of report viewers.
- Click Upload File to add those users to the user filter.
- Review the available users or clear the list if necessary.
- Click on SFTP to continue.
Figure 8: Interfolio pathway - User list

SFTP Connection
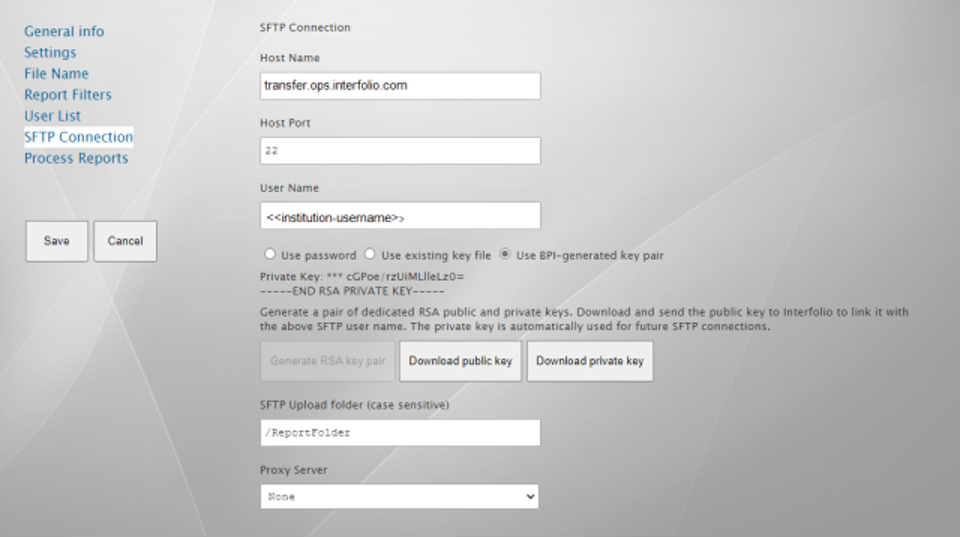
There are three different authentication methods that can be used to connect to the SFTP server. The recommended method is the BPI-generated key pair, but the pathway also supports using an existing key file.
Add the SFTP Connection settings used to connect to the Interfolio SFTP server where the reports will be uploaded. SFTP must be set up before the reports can be uploaded.
USE BPI-GENERATED KEY PAIR CONNECTION
Follow these steps to set up the SFTP connection:
- Enter the SFTP site information (transfer.ops.interfolio.com) into the Host Name.
- Enter 22 into the Host port. You may need to whitelist the following IP addresses: 3.215.32.29, 52.202.198.155.
- Enter a name into the SFTP User Name. If this is the first time you are creating this pathway, you can create your own username, however, if the username is already in use on the Interfolio site, you will need to change your username. This will be provided by Interfolio and will usually take the form “explorance_[database name in FAR].”
- Choose the authentication option Use BPI-generated key pair.
- Click Generate RSA-key Pair. This RSA-key pair can only be generated once for each pathway.
- Click Download public key to download the Open SSH formatted key.
- Create an Interfolio support ticket by following the instructions in the section called Interfolio support ticket for SFTP account creation.
- Add a sub-folder name on the SFTP server to upload the reports. (recommended)
Note
Public reports can only be included if a User List has been uploaded.
- Select the Proxy Server type (optional).
- Enter the proxy host name or IP address in the Host field.
- Enter the port being used by the proxy server into the Port field.
- Include the username and password for the proxy server.
- Click Save to save all your work entered so far.
- Click Process Reports to proceed to the final step.
Figure 9: Interfolio pathway - SFTP connection
Interfolio Support Ticket for SFTP Account Creation
Once the RSA key has been generated, a support ticket must be submitted to Interfolio via https://product-help.interfolio.com/en_US/technical-resources/sftp-set-up Please include the institution’s contact on your request & specify in the ticket that your request is for an Explorance integration
The form will generate a support request for the Technical Services team.
Once the ticket has been submitted, Interfolio may take up to 10 business days to create your account. If the client already has an SFTP, Explorance will be added as a user to a sub-directory of the existing folder (must be explicitly requested).
OTHER SFTP CONNECTION METHODS
If you are not using the BPI generated key-pair connection, there are two other connection methods available. For example if you wanted to upload reports to another SFTP server other than Interfolio you can use one of the methods below:
Use existing key file connection
In the situation where you already have an SFTP account established with a user name and private key then follow these steps to set up the SFTP connection:
- Enter the SFTP site information (sftp.<example>.com) into the Host Name.
- Enter 22 into the Host port.
- Enter a name into the SFTP User Name.
- Choose the authentication option Use existing key file.
- Upload your private RSA-key.
- Add a sub-folder name on the SFTP server to upload the reports. (optional)
Note
Under most circumstances a sub-folder is not needed, however, if a sub-folder is required it must be preceded with a forward slash (/). In case a sub-folder is needed, use FileZilla or a similar SFTP client to create the subfolder. Connect with FileZilla using your username and the private key which can be downloaded by clicking Download Private Key . then create the necessary folder on the SFTP server
- Select the Proxy Server type (optional).
- Enter the proxy host name or IP address in the Host field.
- Enter the port being used by the proxy server into the Port field.
- Include the username and password for the proxy server.
- Click Save to save all your work entered so far.
- Click Process Reports to proceed to the final step
Process Reports
Process Reports is where the extraction, verification, and uploading of the reports happens. This action retrieves all the reports from Blue that are determined by the report filter and the user list and renames the reports according to the rules created earlier. The extract process and the upload process make take a significant amount of time to complete, these processes run in the background so it is OK to close the browser and come back to the page after a period of time.
To verify the extracted reports that will be sent to Interfolio follow these steps:
- Select the method to process reports.
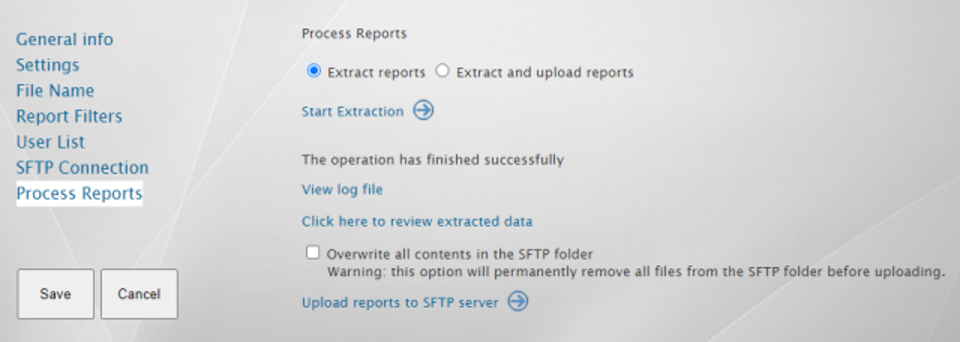
- Select Extract Reports, this will retrieve the reports from Blue but does not upload them to the SFTP server immediately. This step allows you to verify the prepared reports before they will be uploaded to the SFTP server (this step does not require the SFTP connection to be set up).
Figure 10: Interfolio pathway - Process reports - Extract reportsNote
Public reports can only be included if a User List has been uploaded.
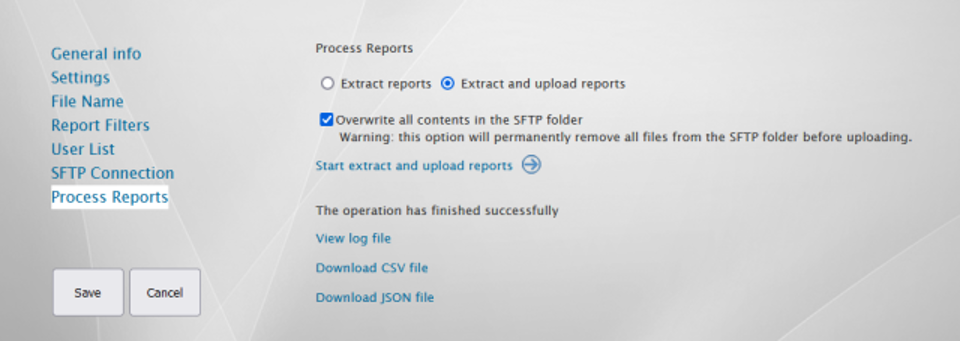
- Select Extract and upload reports, this option will extract and then upload the reports to the SFTP server in one action.
Figure 11: Interfolio pathway - Process reports - Extract and upload reports
- Select Extract Reports, this will retrieve the reports from Blue but does not upload them to the SFTP server immediately. This step allows you to verify the prepared reports before they will be uploaded to the SFTP server (this step does not require the SFTP connection to be set up).
- Click Start Extraction or Start Extract And Upload Reports . A confirmation dialog will appear.
- Click View log file - this log contains information about how many reports were extracted and if the operation was successful.
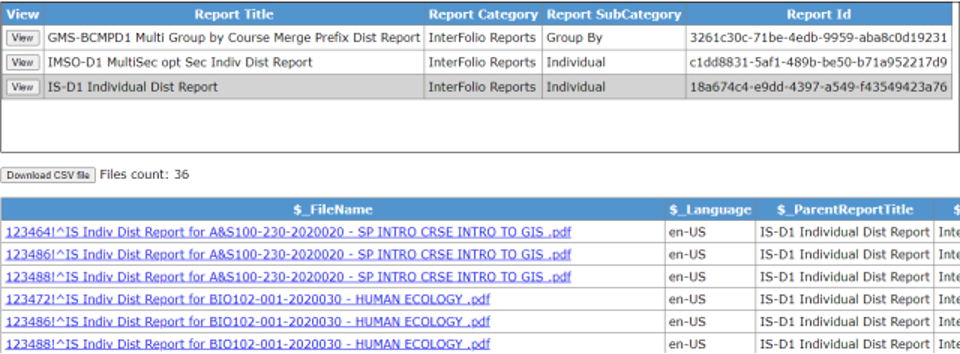
- Review the extracted data by clicking Click here to review extracted data, from here you can verify the naming convention of the extracted reports. Click on the PDF hyperlinks to download and review the report contents.
Figure 12: Interfolio pathway - Extracted data verification
- Click Save And Extract.
- Choose whether or not to enable the Overwrite all contents in the SFTP folder option. This will remove all files from the SFTP folder, which can be useful if you want to start fresh for the new semester, etc.
Caution
The Overwrite all contents in the SFTP folder option will permanently and irrevocably remove all files that are contained within the SFTP upload folder. If this field is left blank, all files located in the root folder for the account will be removed.
- Click Upload reports to SFTP server once you have verified that the reports have been properly named and you are satisfied with which reports have been included (this is only required if you selected the Extract reports option in step 1.)
After SFTP File Uploading, Create an Interfolio Support Ticket
Unless you have previously arranged an upload cadence with Interfolio, once the PDF reports have been successfully uploaded to the Interfolio SFTP site, a support ticket must be submitted to Interfolio via an email to help@interfolio.comso that Interfolio can integrate these reports into their FAR product.
Once the ticket has been submitted, Interfolio will acknowledge the request in 2-3 days and it may take up to two weeks to complete the processing. Please refer to the adhoc file processing SLA here.