Check out our upcoming webinars and client office hours calendar here!

How Can We Help?

Search icon

Search Results

Add a Built-in FAR Vita Section to a Case or Template

Unit Administrators at academic institutions that use both Review, Promotion & Tenure (RPT) and the faculty reporting tool Interfolio Faculty Activity Reporting (FAR, Faculty180) have the option to add a built-in vita section when creating or editing any case or template in RPT. This FAR Vita section will pull a candidate's vita directly from FAR, using a FAR vita template of the case/template creator's choice. This will transfer correctly formatted information from the candidate's FAR account directly to the RPT case, including the materials (files) that were attached to the candidates' vita in FAR. The vita and all attachments can then be reviewed in the RPT document reader.


When the vita is pulled from FAR into RPT in this way, the vita document and the attached materials are grouped together as a bundle, and cannot be rearranged or extracted. The order is determined by the FAR vita template. Therefore, for considerations around the sequence of sections or materials that are attached to the vita, always plan when creating the vita templates in FAR. It is possible to include additional candidate sections in the actual RPT case, or permit the candidate to create them. There is no reduction in the previous case functionality.


Add FAR Vita Section to a Template

Unit Administrators and Template Administrators can create and edit templates.


1. Navigate to the desired Template under Templates

Navigation: Templates > Add Template

  1. Click Templates under Review, Promotion & Tenure (RPT) on the navigation menu.
    Review, Promotion & Tenure section with Templates selected
  2. Click Add Template

    Note that this can also be done when editing a template already created.

     
  3. Enter the Title, Description, and Unit the template will fall under.
  4. Select the Type of template being created.
  5. Click Save & Continue when finished.


2a. Add Vita

  1. Click Add Vita under the Faculty Activity reporting Vita section. This will automatically pull in a vita from FAR for inclusion in the packet.
    Faculty Activity Reporting Vita section with Add Vita button selected
  2. Select the number of terms desired for the vita to cover.
    • For example, if setting up an annual review where the school uses Fall, Winter, and Spring terms, then 3 terms would be selected. If this was for a three-year review then 9 terms would be selected.
  3. Select the Vita Type (Legacy Vita or New Vita Builder).
  4. Select the Vita to be pulled from the list of available vitas.
    • Click Change Selected Vita to change the vita selected.
  5. Click Add Vita when finished.


2b. Edit Vita

  1. When editing a template go to the Candidate Requirements page.
    Creating a template section with candidate requirements selected
  2. Scroll down to the Vita Requirement and click the Change button.
    Vita section with Change button selected
  3. Change the Number of Terms or the selected Vita on the drawer that appears on the right-hand side.
  4. Click Add Vita when finished.


Add a FAR vita section to a Case

Unit Administrators and Case Managers can create and edit cases.


1. Navigate to Cases

Navigation: Cases > Select Case

  1. Click Cases under Review, Promotion & Tenure (RPT) on the navigation menu.
    Review, Promotion & Tenure section with Cases selected
  2. Select Create a Case if creating a new case or select a Name from the list if editing an already existing case.
    • If editing a case select Edit Case from the Case Options dropdown on the right-hand side.
      Case Options dropdown with Edit Case selected
  3. Go to the Candidate Requirements section.
    Creating a template section with candidate requirements selected


2a. Add Vita

  1. On the Candidate Requirement page, scroll down to the Vita section and click the Add Vita button.
    Faculty Activity Reporting Vita section with Add Vita button selected
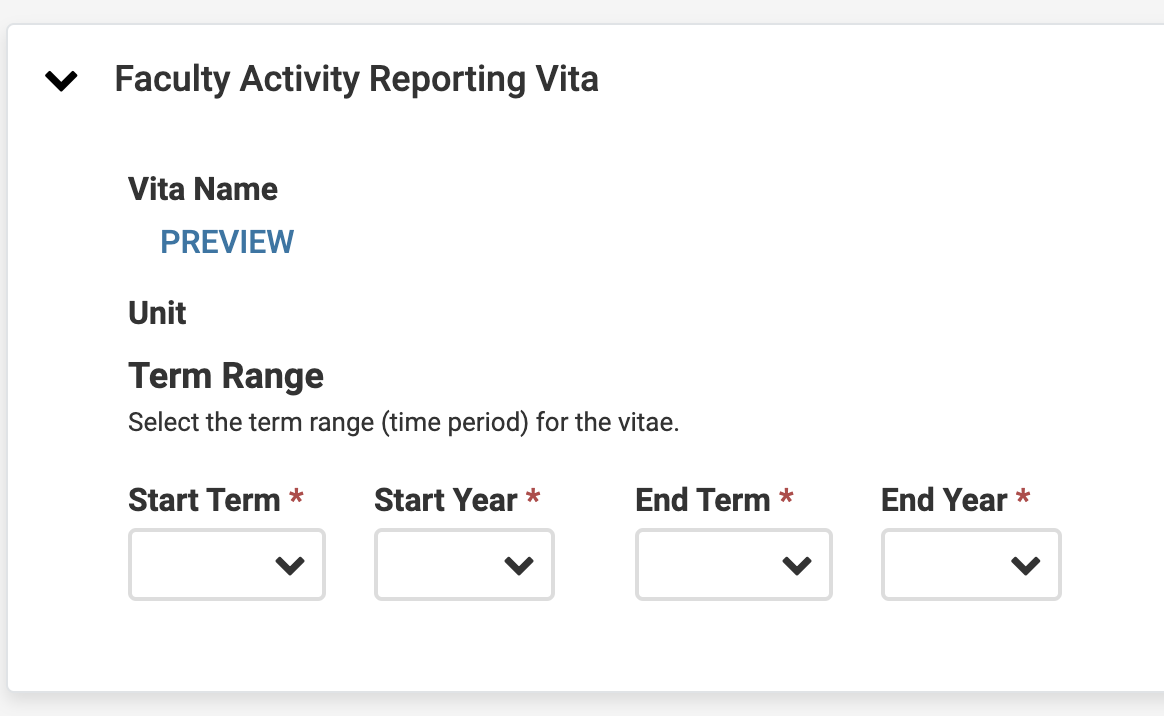
  2. Select the Start and End Terms and select the Vita.
    Add Vita section with terms, select Vita Type and Select Vita field as subsections
  3. Click Add Vita when finished.


2b. Edit or Remove Vita

  1. On the Candidate Requirement page, scroll down to the Vita section and click Change or Remove.
    Vita section with Change button selected and Remove button next to it.
  2. Change the term range or selected vita on the drawer that appears.
  3. Click Add Vita when finished.


If using a template that will pull in vitas from FAR, then the case creator will need to update the start and end terms for the vita.


Edit/Adjust the Vita Term Range When Creating Cases in Bulk

  1. Check out this article on How to Create Cases in Bulk for Multiple Candidates at Once for more detailed instructions on this process.
  2. On the Summary & Confirmation page, scroll down to the Vita section to adjust the start and end terms.
    .Vita section with dropdowns for start and end term

Manage a Candidate's Vita

Regenerate a Vita

A reviewer can regenerate a vita if the candidate's activities have been updated in their FAR account since the vita was first generated or if they want to change the term range. 

 
  1. Navigate to the desired case.
  2. Click the Edit button adjacent to the desired vita under the Candidate Packet section.
    Candidate Packet section with Edit selected adjacent to vita under the Actions column
  3. Click Regenerate to regenerate the vita with the new term range.
    • When the vita is re-generated, it will contain a snapshot of the candidate’s data pertaining to the periods of time selected by the term, current up to the moment when you click the button to generate the vita.
  4. Click View History on the vita section to quickly see the history of the FAR Vita. This will open a window with a date and time-stamped listing of all change details. 
  5. Click View Vita to open a copy of the vita in the document reader as it appeared at the given date and time.


Lock/Unlock the Vita Section

Unit Administrators, Case Managers, and Committee Managers can lock and unlock the FAR vita via the Lock button that appears in the vita section

  • Candidates cannot add, change or remove a Vita Template from an RPT Case, but under certain circumstances, they may be able to change the term range and/or regenerate the Vita.
  • A Candidate viewing a packet with a locked Vita "section" will not see an option to edit the vita and should mot be able to change the Start and End Dates for the Term Range and/or regenerate the Vita and its corresponding attachments


About Vita Generation Errors

If a FAR vita is unable to be generated for any of the candidates for which a case is being created, an error (as can be seen in the image below) will display above the list of cases indicating that the candidates listed must be reviewed. 
Candidates section with error code at the top saying "We are unable to generate a vita for 1 of the selected candidates. Please review the candidates listed below and select whether you want to create a case without a vita or remove the candidates from the process.


When reviewing the candidates selected either create a case without a vita or remove the candidates from the process.

Action Steps
Remove the Candidate Click Remove adjacent to the candidate from the list to cancel the creation of their case. Then the case creation process can continue.
Change the Vita
  1. Click Change Vita if that option is available.
  2. Select the Change Selected Vita button to select a new vita.
     Add Vita section with Change Selected Vita button below
  3. Click Add Vita when finished. Then the case creation process can continue.


FAQs

When should I use FAR to upload materials vs uploading materials to RPT?

In general, if the document is for a current or future review, it should be uploaded to the Case Packet in RPT. If the document is important as evidence of a record, or documentation of an activity, it should be uploaded to FAR and attached to the record it supports.


What are the best file types to use for Vita Attachments?

The most common file and document types used in academia can be read directly in the document reader in RPT. After submitting a file attachment to FAR that file is sent over to RPT where Interfolio will convert that file to PDF format to be displayed in the reader.

Please note that file types not supported by the reader will still appear in the reader as a link that the recipient can download to access the file. Further, if an artifact from FAR can not be properly converted, a link to the file is still presented in the document reader in RPT and should default to providing RPT with the original file itself.


The following text or image based file types can be displayed directly in the document reader as Vita Attachments.

  • DOC/DOCX
  • XLS/XLSX
  • PPT/PPTX
  • DOT
  • ODT
  • WPD
  • RTF
  • TXT
  • HTML
  • PDF
  • TIF, TIFF
  • PNG, JPG,JPEG,GIF,BMP
  • Links to webpage URLs

Please note that the best practice is always to convert the document files to PDF before uploading. This will give the most control over how the artifacts display.


Links to webpages, and audio and video files that are attached to a vita will display as a URL (link) when the vita is viewed in the document reader. Clicking the link will open the webpage or hosted audio and video in a new browser tab or window.


What should I do if a Vita Attachment fails to transfer over to RPT?

Go back into FAR and re-upload the document that failed to transfer. If one or more of the documents attached to the vita does not convert successfully to RPT, go back to the record with the document attached and try to upload the document again.

  • Files that will not display in the reader:
    • Files with improper extensions (such as a Word document (.doc) extension, that is misidentified as a .zip file)
    • PDFs with complex fonts or highly layered contents
    • Extremely large PDFs
    • Scrollable PDFs
  • Files that are never sent over to RPT as viewable or downloadable will show as file type errors. If an artifact from FAR cannot be properly converted to display in the reader, a link is still provided for the file to be downloaded from the reader. However, the file types listed below will not be sent to RPT.
    • Encrypted PDFs (they have password protection)
    • Corrupt or damaged PDF files (they cannot be read by any PDF reader)
    • Empty size files (of any type 0-byte files (these are most commonly .txt or other plain text file types)
    • Files over 750 MB (of any type)
 

Why isn’t my draft template from Faculty Activity Reporting available to select in Review, Promotion & Tenure

Only published templates will show up as options to select in RPT. Drafts will not appear because drafts can be in various stages of completion and may not be ready to use yet. 

As a workaround, we suggest users publish the template, and then they can use it in the Vita Builder integration with Review, Promotion & Tenure. 


Was this article helpful?
Give feedback about this article