

Bulk Base Data Uploads in FAR
Administrators can upload and manage base data (such as faculty, secondary units, and course information) in bulk to add or modify information easily. This can be done manually or automatically via SFTP. For more information about autoloads in Faculty Activity Reporting (FAR), contact your Interfolio representative.
Imports will be executed at 2:30 AM EST/3:30 EDT daily. If no data is found, or if an Error Message appears, then the import will not occur.
Unit files should not, under any circumstances, be loaded through the User Interface (UI), but rather set up manually through the Organizational Structure page.
Upload New File
1. Complete Required Pre-Upload steps
- Test Upload: When uploading a data set for the first time or after changing the file format, test the upload in a test or development database before using Production.
-
Verify File Format & Review Column Structure: Verify file format and column structure under Setup > Upload Form menu.
Download a template from the UI to ensure correct formatting.
- Accepted File Formats: CSV (comma-delimited), TSV (tab-delimited)
- Accepted character set/encoding: UTF-8
- Header Row: Should clearly describe column content, as seen on the Base Data Models sheets
- Configure Form/Classification: This may include the Upload form or Faculty Classifications
2. Upload Data and Select Upload Type
- Navigate to the Administration page and click Upload Data under the Bulk Data section.

- The ‘Upload Data’ page will display he 50 most recent data loads, including details such as time generated, load type, semester, unit, number added, existing courses, and errors. Use the filters at the top to narrow results and click column headers to sort the list.

- Scroll to the bottom of the page and click the New Upload button to navigate to the ‘New Upload’ page.

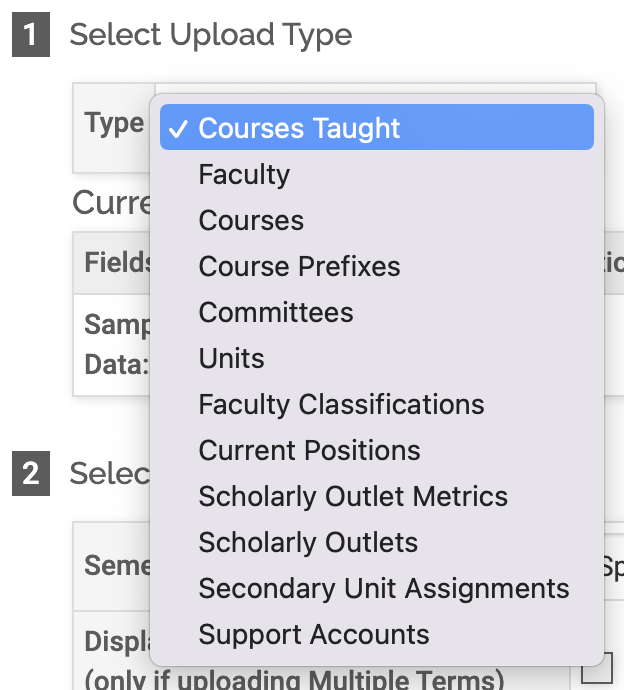
- Select the Upload Type.
Recommended Data File Submission Cadence
- Faculty, Faculty Classifications, Support Accounts: Weekly or monthly
- Courses Taught: 2 weeks after term starts or after add/drop period
- Co-taught Courses: To load co-taught courses, enter one row of data per faculty member and use the "weight" field to indicate the percentage assigned to each instructor.
- Existing Faculty: When updating existing users via the data file, all fields will update as expected, except for Employment Status, Faculty Rank, and Tenure Status. These fields are managed separately via the Faculty Classification file and will not update through the standard user data file. Additionally, if Unit is not included in the file, the system will apply the default value selected in the UI.
3. Complete Remaining Upload Fields
Please see below for further information on fields and settings available when performing a given upload. These upload options will vary based on the Upload Type specified above.
| Field | Upload Type | Definition |
|---|---|---|
| Semester | All |
The academic term for the data upload is typically specified in one field, but some upload types may allow multiple terms based on the file content. You can adjust the year range shown in this dropdown when setting up institution details under the ‘Miscellaneous’ section. |
| Semester | All |
The academic term for the data upload is typically specified in one field, but some upload types may allow multiple terms based on the file content. You can adjust the year range shown in this dropdown when setting up institution details under the ‘Miscellaneous’ section. |
| Unit | All | The unit for the data load is typically specified in one field, but some upload types may allow multiple units based on the file content. |
| Update Existing Records |
Courses Taught Faculty Courses Course Prefixes Committees Units Scholarly Outlet Metrics Scholarly Outlets Support Accounts |
The fields that the system matches against vary by file type. Contact Interfolio-support@elsevier.com or your Interfolio representative for details on the required matching fields. Note that in this context, Update means to update existing columns, plus add some new columns. |
| Display Terms in First Two Columns | Courses Taught |
If the Courses Taught file covers multiple terms, check this box to upload data according to the file's terms instead of the Semester field. If this option is selected, this file must then include two additional fields at the beginning: Term and Calendar Year. |
| Remove Existing Courses Taught For Selected Term | Courses Taught |
There are three options available to manage existing Courses Taught:
|
| Check To Inactivate Faculty Not In Upload (for tenants without UID) | Faculty |
To keep the faculty list current, check this box to deactivate faculty accounts in bulk. A dialogue box will then open to refine deactivation criteria, including employment status, terms, and login access.
After the upload, faculty not included in the file and meeting the criteria will have their status updated to Inactive. When UID is enabled, users that are already active in FAR will remain active when not included in the Faculty file. To set an existing user's Employment Status to Inactive, use the Faculty Classification file. To 'Disallow Login' for an existing user, set "Allow Login" to 0, n, no, or false in the Faculty file. |
| Respect Locked Preferred Names | Faculty | If the Preferred Name faculty classification has been locked and Yes is selected for this field, then the faculty file will not alter the name for the applicable faculty members. |
| Do Not Send Login Details | Faculty |
This box, located next to the Type dropdown at the top of the page when Faculty is selected, is checked by default to prevent sending automatic login emails to faculty. It does not apply to institutions using Platform Single Sign-On (SSO). It is recommended to keep this box checkedto ensure that school administration is able to send customized and accurate notifications to faculty. |
| Display Terms in First Four Columns | Faculty Classifications | The first four columns are required by Interfolio's data model. When this option is selected, the file will need to be formatted with four additional fields as the first four columns; Start Semester, Start Calendar Year, End Semester, and End Calendar Year. |
| Remove Existing Position Titles | Current Positions |
There are three options available to manage existing Position Titles:
|
| Remove Existing Secondary Assignments | Secondary Unit Assignments |
There are four options available to manage existing Secondary Unit Assignments:
|


4. Upload File and Validate Data

- Click Choose File to select the completed file to be uploaded and check the File Has Header Row box if the first row contains headers to exclude from the upload.
The faculty file does not update Faculty Classifications (employment status, faculty rank, tenure status, etc.) after the initial load. Updates must be made through a Faculty Classification load.
- Click the Validate button to validate the file format.
The Validation process checks for correct file type (.CSV or .TSV), the number of columns, and required data. If the file format is incorrect, column count mismatches, or data is missing, the file will not upload, and the error reason will be provided. Please note that this process is limited to the above criteria and does not validate the data itself for accuracy.
- Click Upload once the file has been validated successfully.
If a field, such as billing address, was included in a previous load but is removed in the current file, the system will not overwrite it and will keep the previous field. To delete a previously loaded field value, include the field in the new upload configuration and leave it blank.
Manage Previous Uploads
After uploading a file, administrators with the necessary permissions can review new entries, existing records, and errors, and make changes as needed. For updating a few entries, this method is useful, but for many modifications, a new bulk upload to update existing records is recommended.
Check out our Autoload Information article for further details on naming conventions and supported file types.
- Navigate to the Administration page and click Upload Data under the Bulk Data section.
- Click the Edit (pencil) icon next to the applicable entry to navigate to the Upload Form page.

- Click the hyperlinked number under Added (newly uploaded records), Duplicates (existing records already in the system), or Errors (records that failed to upload, with reasons listed in the Reason column) to review the records for each category.
The table below summarizes the available actions (Download File, View, Edit, Resubmit, and Delete) for each record status (Added, Duplicates, and Errors).
- Download File returns a CSV file of all new entries in the original upload
- View displays the details of specific records.
- Edit allows the administrator to make changes to the details of a specific record.
-
Resubmit submits any changes made by the administrator using the Edit function. This allows the administrator to make changes without uploading a new file.
- Delete removes the record of the entry and error from the logs. Deleted entries can not be restored or modified in the future, and a new upload will be required if the entry is needed.
| Download File | View | Edit | Resubmit | Delete | |
|---|---|---|---|---|---|
| Added | ✔ |
✔ |
X |
X |
X |
| Duplicates | ✔ |
X |
✔ |
✔ |
X |
| Errors | ✔ |
X |
✔ |
✔ |
✔ |
Please note that existing records which were updated during the upload will still appear under ‘Duplicates’ rather than ‘Added.’
FAQs
Can you upload multiple Race/Ethnicity values in the Faculty File?
You can upload multiple Race/Ethnicity values in Faculty File using the file import. Separate values with a comma, comma + space, or pipe (|)—these delimiters will appear exactly as entered in both the UI and reports.
Alternatively, faculty can select multiple values manually by holding CMD (Mac) or CTRL (Windows) while clicking options. These selections will be displayed as comma-separated values in the UI and reporting.
How far back do the logs for bulk uploads in FAR go?
The bulk upload log in FAR retains up to 50 entries. Once this limit is reached, the system automatically removes the oldest entries to make room for new ones. This means only the most recent 50 bulk upload actions will be visible in the log at any given time.
Why aren’t all Faculty Classification fields available for upload via the FC file?
The Faculty Classification file upload process does not support multi-select values, which means these fields must be entered manually within the system.