

Customize Activity Classifications
Setting up activity classifications is a critical step in preparing for accreditation reporting. Activity Classifications (AC) in Faculty Activity Reporting (FAR, Faculty180) provide a basis for classifying faculty members into useful categories within FAR. They supplement the fields in a section and enable tracking of activity characteristics, such as the review type for a scholarly work (blind peer, editorially reviewed). ACs can be set by administrators and can be locked from faculty edits. They must be attached to a section and they can be set as required or optional. They can be used in multiple sections, and set to only show for particular units. You can attach an Activity Classification to a section when configuring the Activity Classification or when configuring a section.
Some benefits of using Activity Classifications instead of fields include:
- If different units need to collect different data on the same section
- If you need to use specific data as a grouping in a Vita output
- If you need to filter by specific data in reports
Manage Activity Classifications
- Navigate to the Setup page and click Activity Classifications under the Customize section.

- Click the applicable hyperlinked number to navigate to the Manage Activity Classifications page.

-
Unit Usage: Select this dropdown to specify which ACs to display. The following options are available:
- Show All Used By This Unit: Shows all relevant ACs and hides all that are exclusions for my assigned unit.
- Show Non-Global Used By This Unit: Shows ACs that have exclusions, such as those that are not global and that assigned unit is not excluded from.
- Show Global: Shows all ACs that have not been excluded from any unit.
- Show Non-Global: Shows all ACs that are excluded from at least one unit.
- Show Global and Non-Global: Shows all ACs for all units.
- ACs can also be Cloned by clicking the clone icon under the ‘Clone’ column or Activated/Deactivated from this page by selecting/unselecting the check mark under the ‘Edit/Active’ column.
Institutions may choose to deactivate an AC when it’s no longer needed or when its configuration needs to change—such as shifting its availability from a single unit to the entire institution. In cases like these, the original AC should be inactivated, and a new one created with the updated settings.
Deactivating an AC does not delete any previously entered data. That data is retained in the system, but the AC will no longer appear in dropdowns or be selectable in forms. If reactivated, the AC—and its associated data—will become visible again.
Keep in mind, if the “Show in Reports” option is still selected, the AC may continue to appear in reports even while inactive. To fully remove it from reporting views, be sure to uncheck that setting in the AC configuration.
-
Unit Usage: Select this dropdown to specify which ACs to display. The following options are available:
- Click the Add button to create a new AC or click the Pencil (Edit) icon to edit an existing AC.
Once created, faculty members and their surrogates can enter AC data into FAR. The assigned organizational unit is key, as it restricts the visibility of the classification to faculty within that unit and its sub-units. Once entered, activity classification data can be used to filter reports. For example, institutions can generate reports showing trends in faculty scholarly activities and filter these by review type, such as blind peer-reviewed, editorially reviewed, invited, non-blind peer-reviewed, or not reviewed.
- Complete the Activity Classification Form.

Exclude These Units
Click Change and check the units that this AC should be excluded from.

When a new unit is added, Global ACs (those not excluded from any unit) are automatically applied. Administrators can modify which ACs are assigned to the unit as needed. FAR offers several options for displaying and managing ACs, depending on which units they are assigned to or excluded from within the institution.
Display
Administrators can choose from the follow display options. 
Check out this article on Data Integrity for best practices that system administrators should follow when modifying activity classifications.
Supported AC Display Types for Report Filtering
| Can be used as filters | Cannot be used as filters |
|
|
Sum in Default Teaching Section on Vita
The Sum in Default Teaching Section on Vita setting allows values from an activity classification to be totaled in the Teaching section of a Vita. For example, an institution could create a numeric activity classification called Total Credit Hours. If a faculty member has several teaching activities in the same term with values of 10, 5, and 5 credit hours, the Vita displays a total of 20 credit hours for that term.

Requirements and limitations
- The activity classification must use a numeric field. Text fields and dropdown selections cannot be summed.
- The activity classification must be available in the Teaching activity section.
- The total appears only on legacy Vitas. The setting does not calculate or display a total in the new Vita builder.
Options
Administrators can choose the access settings for ACs for faculty and administrators.
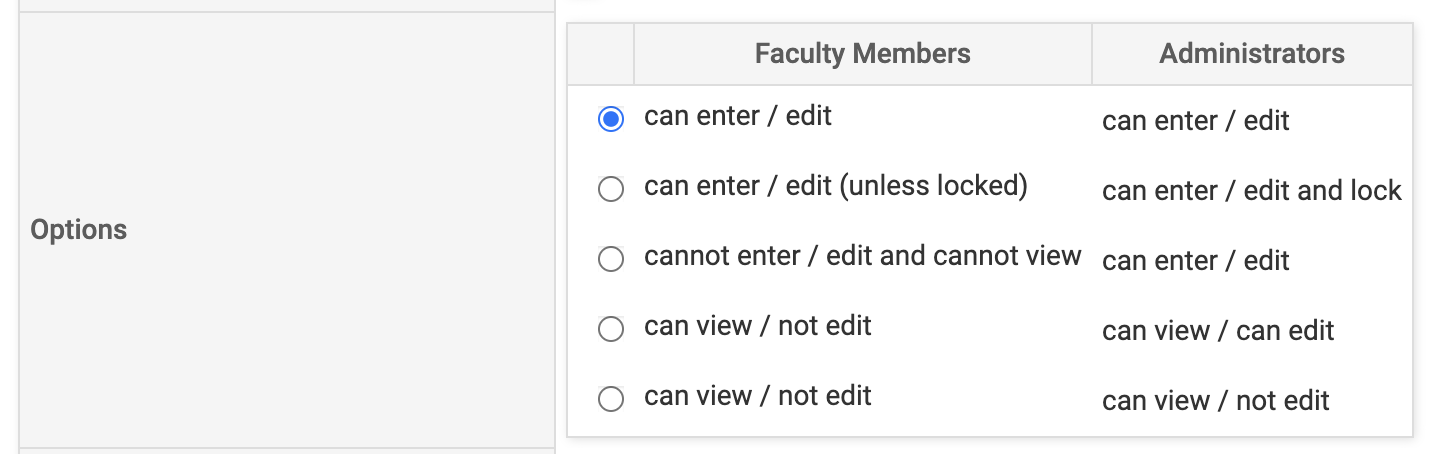
The table below describes each access setting option in detail.
| Option | Description |
|---|---|
| Faculty can enter/edit AND Administrators can enter/edit |
If this option is selected, faculty and administrators can fill out the AC as well as edit their selection later. This option is great to use if the AC is NOT being populated by a file load. This is a great way to collect data points from faculty that do not exist anywhere else on campus and require self-reporting. |
| Faculty can enter/edit (unless locked) AND Administrators can enter/edit and lock |
If this option is selected, faculty can fill out and update the AC unless it has been locked by an administrator, while administrators can fill out, update, and lock the AC. The best practice recommendation is to lock ACs that will be populated by a data file load. The section instructions should include the source system that is used to populate the data, as well as contact information for the source system so that faculty or administrators can reach out to correct any mistakes at the source. |
| Faculty cannot enter/edit and cannot view AND Administrators can enter/edit |
If this option is selected, faculty cannot fill out or update an AC nor can they view the classification. In this case, administrators can fill out or update the AC. This option is great to use if the institution needs to collect certain data points for reporting purposes that the faculty member doesn't have access to, would not know how to provide, or should not see either for confidentiality or to reduce clutter in the data request. |
| Faculty can view/not edit AND Administrators can view/can edit |
If this option is selected, faculty can view an AC but not fill it out or update it, while administrators can both view and update it. This option is great to use if faculty should be able to see a data point that is being loaded on a data file from a source system but should not be able to update it. It is helpful to include the source system that the data is pulling from as well as the administrator for that system in the section instructions so that faculty know who to contact if there is an error in the data. |
| Faculty can view/not edit AND Administrators can view/not edit |
If this option is selected, faculty and administrators can view and AC but neither group will be able to update it in the UI. This option is great to use to seelct if the AC is being populated by a data file load and the information is not confidential. The section instructions should include the source system that is used to populate the data as well as contact information for the source system so that faculty or administrators can reach out to correct any mistakes at the source. |
Classification
Manually enter list options. Enter the dropdown choices in the ‘Option’ field and click ‘Add Another Option’ to add additional choices. Use the checkboxes to select whether or not the AC will ‘Show in Reports’ and whether this option will autofill the ‘Default to this value.’

Once an option has been added and the AC has been saved, that option can be modified but cannot be deleted. If a dropdown option needs to be removed, the administrator should reach out to Support for assistance
Dropdown options should not be modified relating to Accreditation Reports (specified in the Organization column on the Manage Activity Classifications page. If a modification is necessary, the administrator should reach out to Support for assistance
5. Click one of the Save buttons when finished.
The ‘Publicly Displayed’ activity classification is hard‑coded and enabled by default. To disable it, you must contact Interfolio.
How the ‘Publicly Displayed’ value is used:
- API users: Setting ‘Publicly Displayed’ = ‘No’ indicates that the data should not be displayed outside of FAR.
- Web Profiles users: Setting ‘Publicly Displayed’ = ‘Yes’ for supported Web Profiles data types allows the activity to display on the faculty member’s web profile.
-
Manually entered activities: If this field is left blank, the activity will still display on the Web Profile, but the ‘Publicly Displayed’ value in FAR will remain empty. This behavior does not apply to autoloaded data, where a value is required.
- When using autoloads, this classification becomes a required field. If no value is provided for ‘Publicly Displayed,’ the autoload will fail. This is especially important for institutions using autoloads for Grants, as this activity classification is used once it is enabled and is enabled by default for new clients.
FAQs