
Create and Manage Input Forms for Faculty Classifications
Faculty Classifications provide a basis for classifying faculty members into useful categories within Faculty Activity Reporting (FAR, Faculty180). They enable tracking of faculty characteristics, such as faculty rank, tenure status, and employment status (full-time or part-time). Access to manage Faculty Classifications is a unit permission. Users will need Full Administrative rights. Input Forms for Faculty Classifications (FC) can be provided to faculty to fill out every term/year depending on the institution's practices in updating this data/information.
Manage Input Forms for FCs
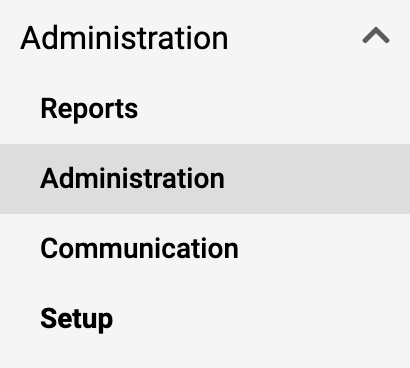
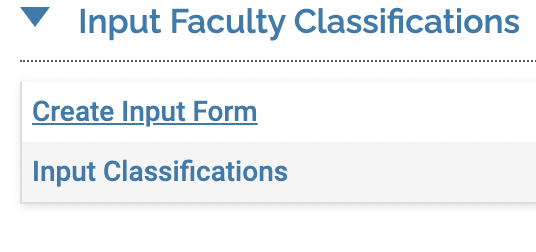
Navigation: Administration > Administration > Create Input Form
- Click Administration under the Administration section of the navigation menu.
- Click Create Input Form under the Input Faculty Classifications section.
- Select the tabs below for next steps on creating or managing FCs.
Create
- Click Add.
- Specify the settings for the Form Details section.
Subcategories Under Form Details
Check out the chart below for detailed information on the subcategories that fall under the Form Details section.
| Field | Description |
|---|---|
| Form Name | Specify a name for the form. |
| Unit |
Click Change to select the unit associated with the Faculty Classification.
|
| Allow input form to be sent to faculty via the Communications screen |
Select this option to add the form for selection to send via the Communication screen. Check out our article on how to Send the Input Form via Communication.
|
| Allow faculty to access a printable version of this input form on the Forms & Reports screen | Select this option to provide faculty with the opportunity to print the form using the Forms & Reports option on the dashboard. |
| Allow faculty to access a printable version of this input form as a permanent Quicklink | Select this option to enable the ability to save the printable version of the form as a Quicklink. |
| Allow evaluations to use a printable version of this input form as a document | Select this option to use the Input Form in evaluations. |
iii. Specify the settings for the Classifications to Appear in Form section.
- Drag and drop the faculty classifications from left to right to include the faculty classification(s) on the form.
- The order for the classifications will affect how they appear on the form.
- Click the Create New Faculty Classification link to create a new faculty classification to add to the form. Check out the article on How to Create and Manage Faculty Classifications.
iv. In the Form Instructions section, enter instructions related to completing the form.
v. In the Default Activity Review section, specify the settings by selecting the default activity to be available for review when completing the input form.
- This is only available when setting classifications for one faculty member at a time.
vi. Click Save when finished.
There is no preview for the form, it is suggested that the form be sent to the administrator creating the form via Communications for preview.
Edit/Delete
When deleting an input form, only the form deletes while the Faculty Classification data remains.
- Click the hyperlinked number for the unit corresponding to the Faculty Classification form to be changed. If necessary, click the plus sign to expand a unit.
- Click the Edit (pencil) icon or the Delete ("X") icon to make desired changes.
- Click Save and Go Back when finished. The Faculty Classification is now deactivated.