

Create/Manage Positions
Administrators and Committee Managers in Faculty Search (FS) can configure positions by setting up key search details, including applicant instructions, document requirements, search committee members, and evaluation criteria. A landing page is automatically generated for applicants to view position details and submit applications. Position visibility can be set to ‘Public,’ making it accessible for online applications, or 'Private,' keeping it hidden from public feeds managed by Interfolio.
Best Practices When Creating a Position
- Deadlines: To ensure applicants are reminded, it is recommended to set a specific close date, instead of a rolling deadline, which triggers automated reminder emails 7 days and 1 day before the position closes, for those who have not submitted. The deadline is 11:59 PM EST on the specified date. Applicants who have not submitted their materials by the deadline will be unable to make edits or submit their applications afterward. You can always modify the close date if necessary.
- Qualification & Application Instructions: It is recommended to separate out qualification and application instructions to make your description more readable.
- Letters of Recommendation: If you don’t want to require confidential letters from all applicants initially, conduct a multi-stage search.
- Optional Documents: To make a requirement optional, add it first, then set the required number to zero so applicants can submit without completing it.
- Editing In Use Document with Caution: When editing required documents and application forms, any changes after the position opens may affect the complete/incomplete status of applications. Committee members, on the other hand can be changed easily at any time.
- Archive Applicants: Archive applicants no longer being considered to prevent them from seeing the Incomplete Application status.
Permissions attached to position statuses do not apply to applicants who have not submitted their applications.
Create a Position
- Navigate to the Positions page and click the +New Position button to create a new position.

Filtering Positions List
When filtering the positions list, you can narrow results by selecting the hosting unit, position type, status, and whether the position is active or closed. The unit filter presents units in a hierarchical structure, allowing you to select one unit at a time. You can also choose to include or exclude child units using a toggle option, giving you more control over the scope of your search.

- To manage an existing position, click the desired hyperlinked position name to navigate to its position overview page. From here you can manage the applicant list.

- To manage an existing position, click the desired hyperlinked position name to navigate to its position overview page. From here you can manage the applicant list.
- When creating a position, complete the first page of the Create Position form and click Create when finished.

Cloning Positions
Cloned positions must remain in the same unit as the original, and any new forms added to the original must be manually added to the clone. It is recommended to update the Position Title to differentiate it from the original.
The following areas do not pull the data from the cloned position over into the new position: Salary, Open Date, Search Committee Membership, Position ID (or Requisition Number), Position Term Length, Funding Source, Hiring Plan and General Notes (including file attachments).
Once created, a position's unit cannot be changed. To move a position to a different unit, it must be recreated from scratch. Positions without applications can be deleted and recreated in the appropriate unit, while those with applications attached can only be closed/archived, not deleted. Deleted positions are permanently removed and cannot be recovered.
Basic Information
Complete the Basic Information including Salary Range or Pay Grades, Open Date and Deadline, Advertising Settings, and EEO Statement. Then click Save & Continue.
- Click the three dots on the toolbar, then click the Tx icon to remove formatting from the selected text.

The position will automatically be published when the Open Date passes.
Required Documents
Set Document Requirements for a Position
When configuring a Faculty Search (FS) position, administrators can specify required application documents using the “Add Requirement” feature. Each document type includes a ‘Number Required’ dropdown where applicants must upload the exact number of required documents from the Accepted File Types list. If multiple references are submitted in a single file, set the requirement to 1. To indicate a document is optional, set ‘Number Required’ to 0 (e.g. if a cover letter is encouraged but not mandatory). To reduce confusion, avoid requesting multiple types of contact references, such as both Confidential Letters of Recommendation and Contact References.
- When editing the desired Faculty Search position, you may set the number of required documents by clicking the +Add Requirement button on the ‘Add Requirements’ page.

- Select ‘Applicants may add additional documents’ to allow unlimited additional uploads
- Select “Send a message on application submission" to send a custom message when an application is submitted.
When enabled, applicants will receive only your custom message instead of the default Interfolio confirmation. You can personalize this message with or without a template and include important details such as next steps.
- The ‘Add Document Requirement’ window will appear, allowing you to select the document type, specify the number of required attachments, and add any relevant notes.

- Add specific instructions in the ‘Requirement Note’ field to give the applicant specifics on what you are looking for, such as due dates for letters of recommendation.
- To make a requirement optional, set the ‘Number Required’ to 0.
Impact of Requirement Updates on Submitted Applications
If the requirements for a position are changed after an applicant has submitted their materials, and if the applicant is still permitted to edit their submission, they will see a note in their Dossier indicating there is a new requirement. The position they applied for will move from ‘Completed’ back to ‘In Progress’ in their Dossier, signaling that edits can be made.
No notification is sent to the applicant regarding the change. They will only see the update if they log into Interfolio.
Required Document Type Options
| Document Type | Description | Type of Request |
|---|---|---|
| Award | Documentation of honors, prizes, fellowships, or recognition received. | File Upload |
| Bibliography | A list of publications, scholarly works, or references relevant to the candidate’s academic field. | File Upload |
| C.V. | Curriculum vitae; a comprehensive academic résumé outlining education, employment, publications, and professional activities. | File Upload |
| Confidential Letter of Recommendation or Evaluation | A confidential letter submitted directly by a recommender, not viewable by the candidate. | Letter of Recommendation Request Process |
| Contact Reference | Contact information for individuals who can provide references upon request. | File Upload |
| Cover Letter | A formal letter of introduction describing the candidate’s interest in and suitability for the position. | File Upload |
| Creative Work | Samples of artistic, design, performance, or other creative outputs. | File Upload |
| Dissertation Abstract | A summary of the candidate’s dissertation, often required for early-career applicants. | File Upload |
| Diversity Statement | A statement addressing the candidate’s experiences with and commitment to diversity, equity, and inclusion. | File Upload |
| Essay | A written response on a specific topic requested by the institution. | File Upload |
| Image | Still images (e.g., artwork, figures, or photos) submitted as part of a portfolio. | File Upload |
| International Financial Statements | Financial documentation required for international applicants, often related to visa or funding. | File Upload |
| Job Market Paper | A major research paper (often the dissertation or related work) submitted by candidates seeking academic positions. | File Upload |
| List of courses taught | A document detailing prior teaching experience and the courses the candidate has instructed. | File Upload |
| Multimedia | Audio or video files showcasing performances, lectures, or creative projects. | File Upload |
| Nomination Letter | A letter formally nominating a candidate for consideration. | File Upload |
| Non-confidential Letter of Recommendation or Evaluation | A recommendation letter that is visible to the candidate as well as the institution. | File Upload |
| Other Certification | Proof of additional credentials (e.g., professional licenses, training certificates). | File Upload |
| Other Document | A flexible option for documents that do not fit other categories. | File Upload |
| Peer evaluations | Assessments or feedback written by colleagues regarding teaching or professional performance. | File Upload |
| Personal Statement | A narrative highlighting the candidate’s background, interests, goals, and motivations. | File Upload |
| Portfolio | A collection of work samples that demonstrate skills, accomplishments, or creative projects. | File Upload |
| Presentation | Slides, lecture notes, or recordings of professional or academic presentations. | File Upload |
| Proposal | A research or project proposal outlining goals, methods, and significance. | File Upload |
| Publication | Published articles, book chapters, or other scholarly works | File Upload |
| Research Plan | A forward-looking outline of intended research projects. | File Upload |
| Research Statement | A description of past, current, and future research interests and activities. | File Upload |
| Resume | A shorter version of a CV, summarizing qualifications, education, and experience. | File Upload |
| Student Evaluations | Feedback from students on the candidate’s teaching effectiveness. | File Upload |
| Summative Assessment | Comprehensive evaluations of teaching or professional performance (often institution-provided). | File Upload |
| Syllabus | Course syllabi from previously taught classes, showing course design and expectations. | File Upload |
| Teaching Certification | Documentation of formal teaching credentials or licensure. | File Upload |
| Teaching Portfolio | A curated set of materials (syllabi, evaluations, philosophy) demonstrating teaching effectiveness. | File Upload |
| Teaching Statement | A reflection on teaching philosophy, methods, and goals. | File Upload |
| Test Score | Standardized test results or other relevant exam scores. | File Upload |
| Transcript | Official or unofficial academic transcripts from prior institutions. | File Upload |
| Video | Recorded lectures, performances, or demonstrations relevant to the application. | Media File Upload |
| Webpage | A link or document pointing to an online portfolio, professional site, or lab page. | Link Upload |
| Writing Sample | A sample of scholarly or professional writing. | File Upload |
Evaluation Settings
Administrators and Committee Managers can set up personalized evaluation criteria through the ‘Evaluation Settings’ page for evaluators to use to rate applicants on a 5-star scale. These criteria can be configured to include or exclude blind review options.

Application Forms
Application forms are used to gather additional information from applicants and can be customized at the institution, college, department, or position level. Administrators and Committee Managers attach forms on the ‘Application Forms’ page.

- The 'Required' label next to a form under Edit Position > Application Forms indicates whether that form is required for all positions created within a specific unit, not just the current one. All forms added to a position are required for applicants to complete before submitting their application.
It is important to note that while a form may be required, individual questions within the form may not be. If a form contains no required questions, applicants can technically submit it without providing any data.
- When an application form is updated, the changes will automatically apply to all open positions using that form. Both the original and updated responses will appear in reporting. Submitted applications will not be marked incomplete, and applicants who have already submitted can return to update the form, if the application allows edits.
Applicants are not automatically notified of new form requirements. Their application will simply appear as incomplete when they log into Interfolio. To ensure applicants are aware of updates, administrators should use the bulk email option to notify them.
- To include Equal Employment Opportunity (EEO) forms, check the box labeled "Applicants must complete an Equal Employment Opportunity form" during position setup. EEO forms collect demographic data and can also be customized by institution, college, department, or position. Only users with EEO access can view applicant responses. collect applicant data and can be customized by institution, college, department, or position.
Search Committee

Note that in order to be assigned to a search, potential committee members must be added to the program as FS users. If the desired user cannot be found it may be because they need to be assigned the Committee Manager Role on the Users & Groups page.
Position Notes (Public and Internal)
Positions Notes may contain Public Facing Notes (if enabled by institution) and/or Internal Notes (hidden from applicants). You can include a position ID, salary range, term length, funding source, hiring plan, and other relevant files.

The options in the ‘Appointment Type’ dropdown are hard-coded and cannot be changed.
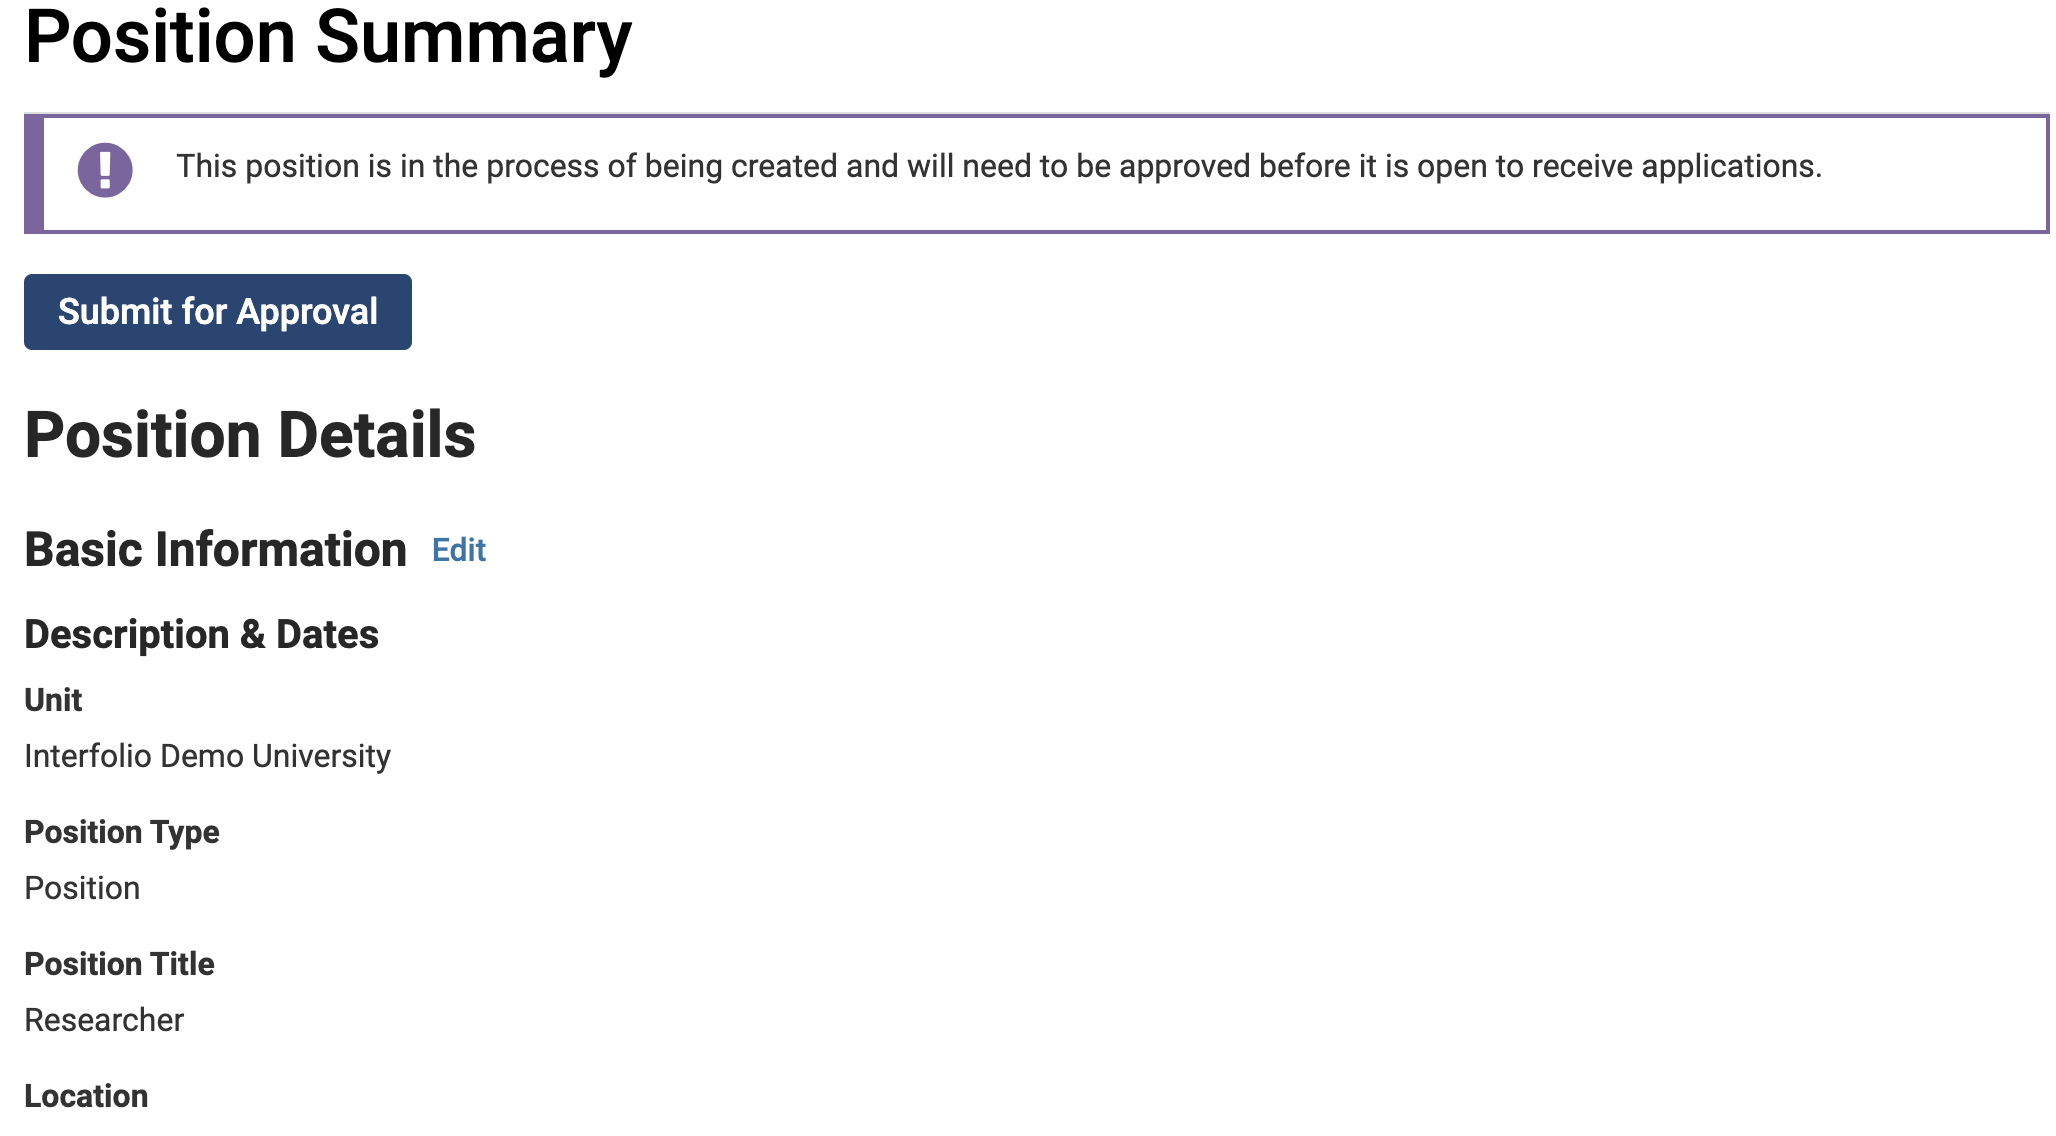
Position Summary Page
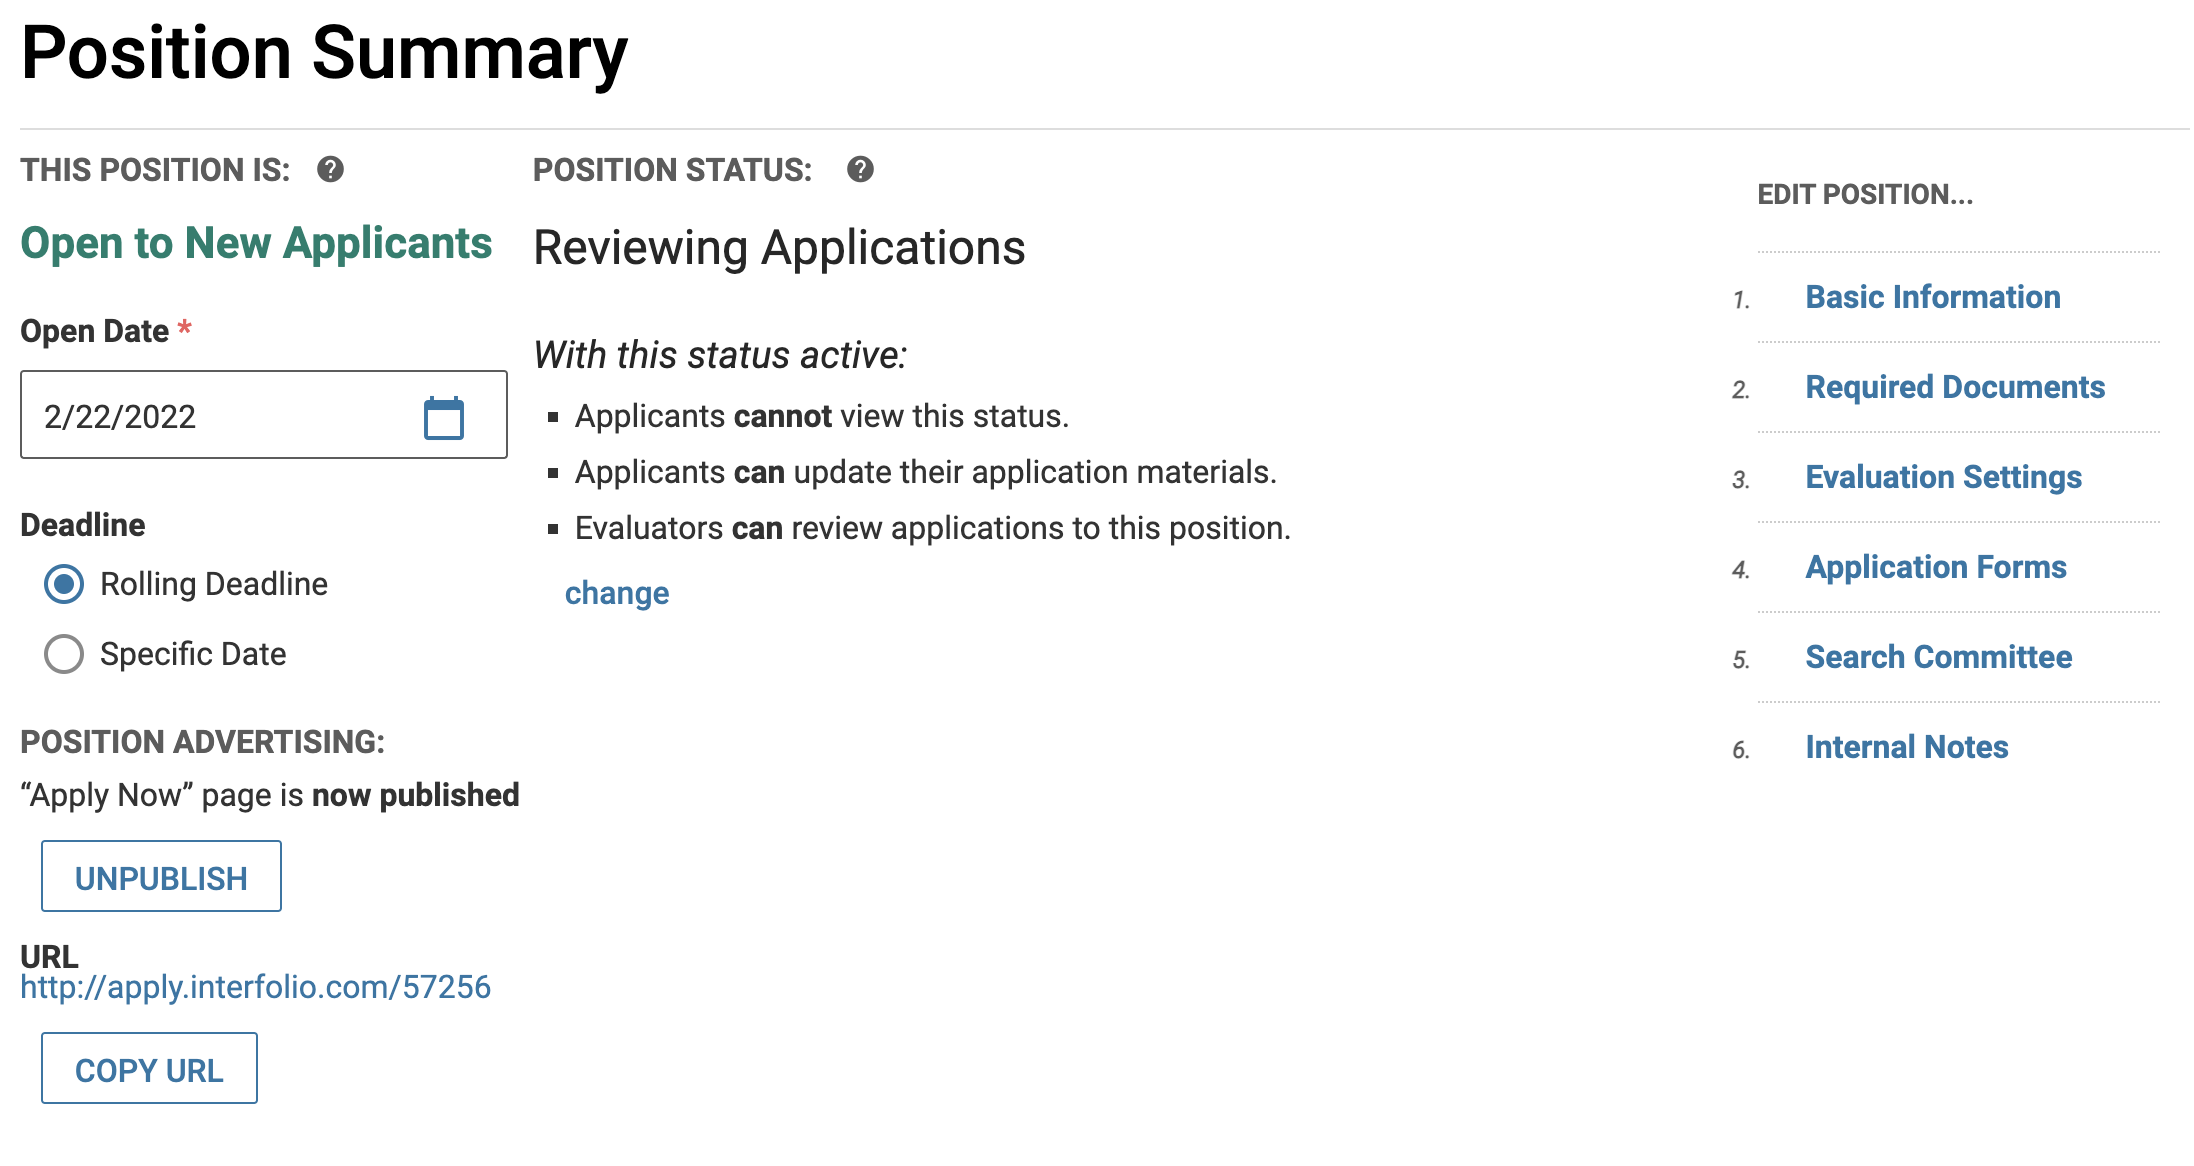
Review the Position Summary page and make the desired changes. Use the navigation bar on the right under 'Edit Position' to navigate to the desired page to edit.
On the Position Summary page you can set the open date, deadline, position status/settings, and whether the ‘Apply Now’ landing page is published. Ensure the Apply Now landing page is published before the open date, as the position must be published for applicants to apply, even if set to Private.
If required, click Submit for Approval. The responsible administrator will be notified by email and upon logging into the program. Edits can still be made while awaiting approval. A notification will be sent once the position is approved or if changes need to be made to the position.
FAQ
Why am I seeing the FS error message: "Validation failed: User Sorry! User is not a valid committee manager"?
This error typically occurs when creating a position using a template that includes an approver whose access or role has changed. If any step in the position or selection approval process contains an outdated approver, the system will block the creation of the position and display this error.
To resolve the issue, the Institutional Administrator (IA) must update the template to ensure that all approvers have the correct access and roles. Unfortunately, the system does not indicate which specific step is causing the error, so it's recommended to review each approval step individually until the problematic one is identified.